Vessels
The Vessels tab is used to add the Vessels, and Vessel Configurations, to the system that are used in creating schedule in the system.
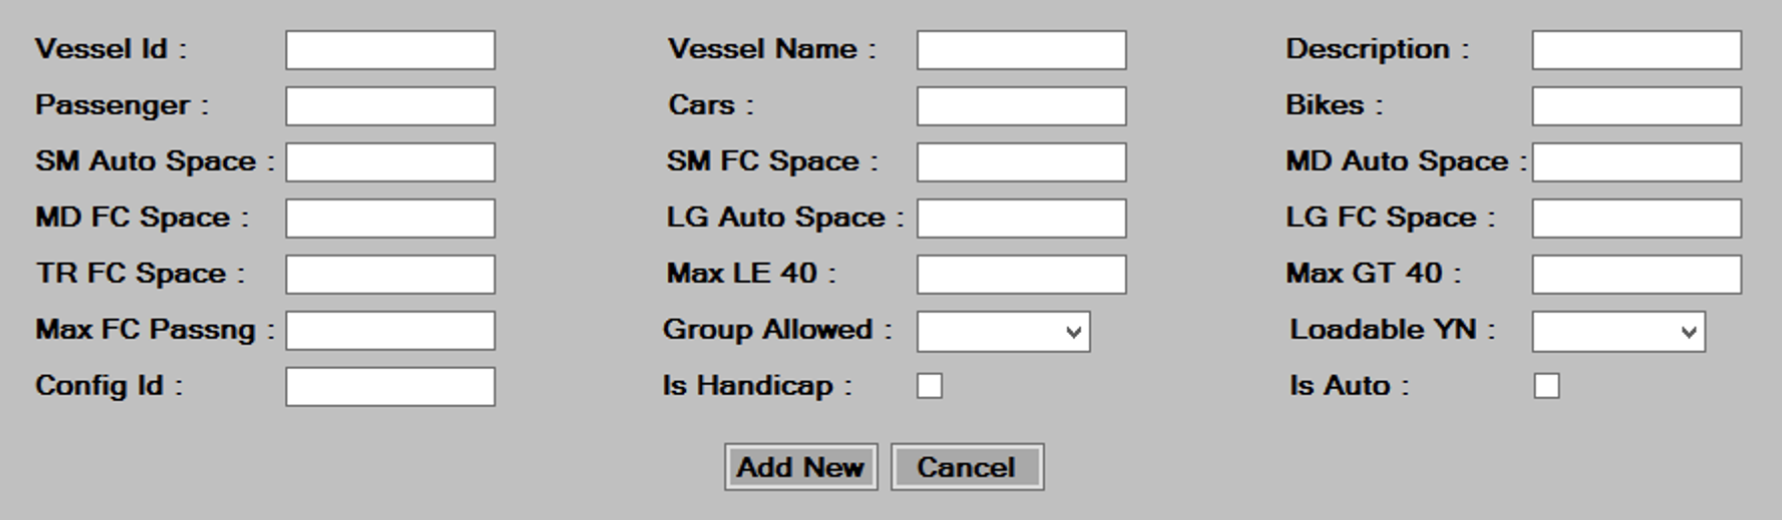
Adding a New Vessel
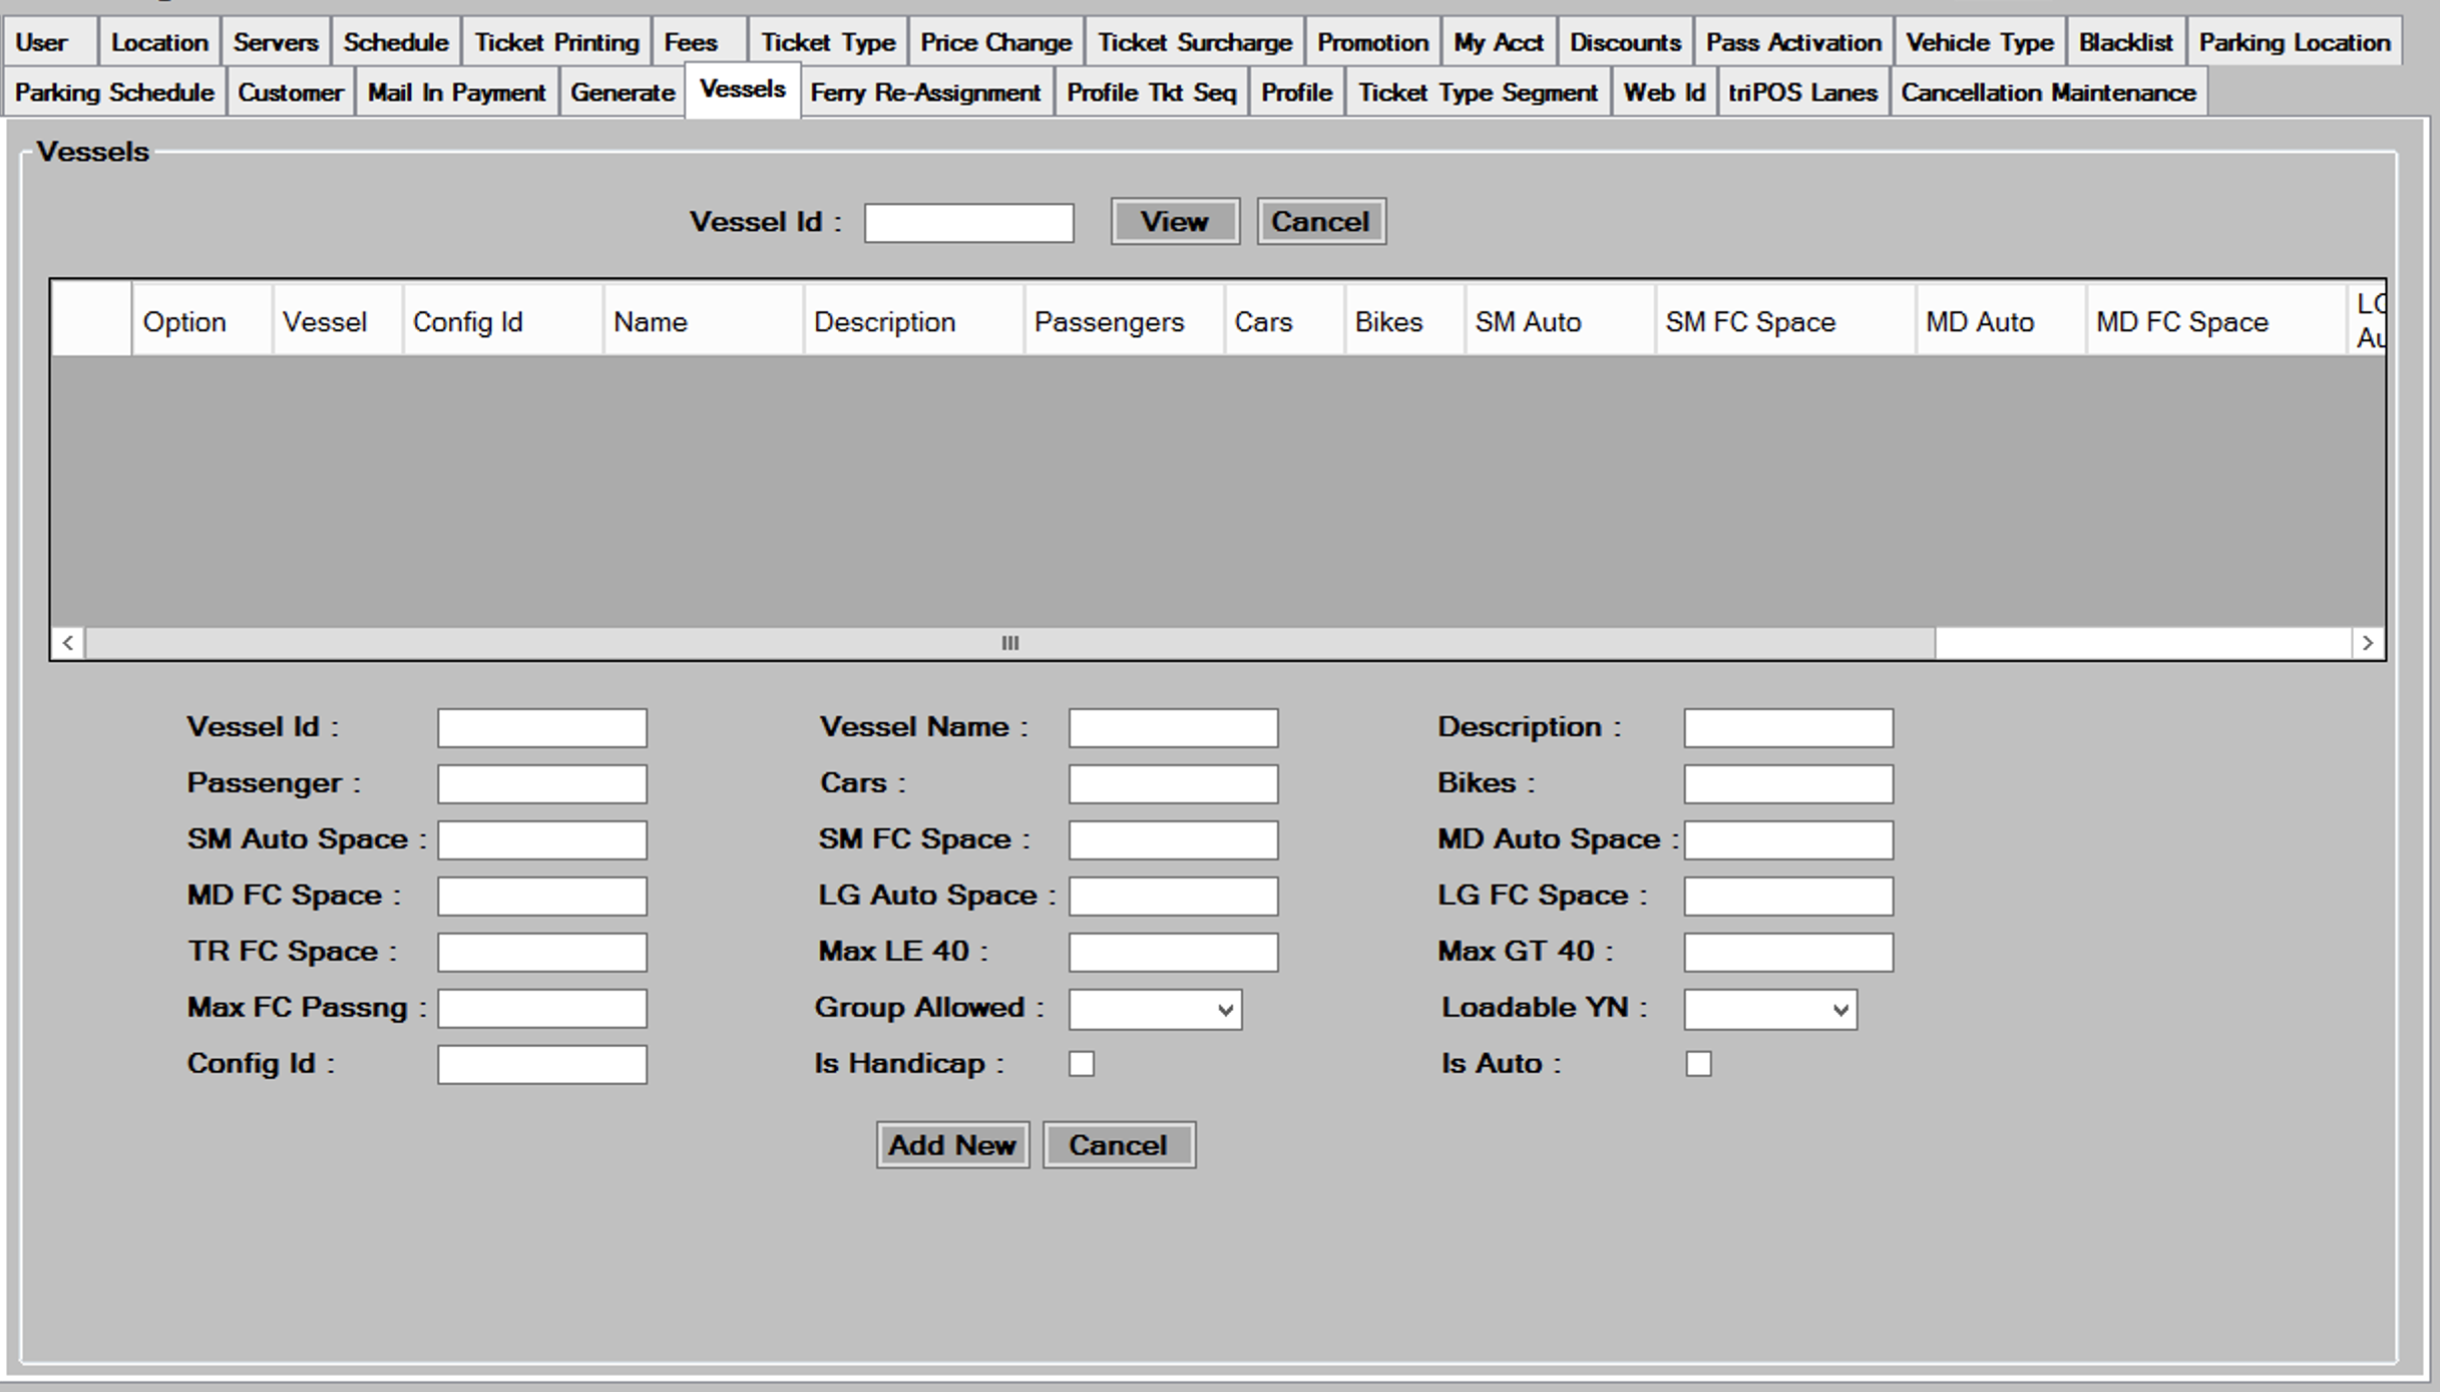
- Enter the Vessel criteria that applies for the vessel you are creating.
- Type in a Vessel ID, two positions, letters and numbers.
- Type the name of this Vessel.
- Type a description of the vessel.
- Type in the total Passenger Capacity of the vessel.
- Type in the total Car capacity of this vessel.
- Type in the Bike capacity of this vessel.
- Type in the number of Small Auto spaces on the vessel.
- Type in the number of Small First Class spaces on the vessel.
- Type in the number of Medium size car spaces on the vessel.
- Type in the number of Medium First Class spaces on the vessel.
- Type in the number of Large size car spaces on the vessel.
- Type in the number of Large First Class spaces on the vessel.
- Type in the number of Truck First Class Spaces.
- Type in the maximum number of Truck type vehicles </= 40 ft.
- Type in the maximum number of Truck type vehicles > 40 ft.
- Type in the maximum number of First Class passengers.
- Select whether group reservations are allowed.
- Select how truck lanes are loaded; loadable yn.
- Select the Config ID.
- Check this box if the vessel is Handicap Accessible.
- Check this box if the vessel carries Auto’s.
- When setting up the previous fields, keep these things in mind:
- The actual car capacity of the vessel will be calculated by adding the SM Auto Space, MD Auto Space, LG Auto Space, and total Truck Spaces from the truck lane space configuration. The Car capacity field is informational only.
- The Auto First Class Spaces do not add additional Auto space to the vessel, they use up the space configured in the regular auto/truck space fields.
- If you have two or more truck lanes side by side, the Loadable YN field should be set to N if you fill one truck lane before using the one next to it. It should be set to Y if the truck lanes are balanced, so truck 1 would go in lane one, truck 2 in lane 2, truck 3 in lane 1, etc.
- If the vessel holds truck type vehicles, truck lanes need to be added using the
 button which will de described later in this section.
- Press the
 button to add the vessel, and then press
  to continue.
Editing/Deleting Vessels
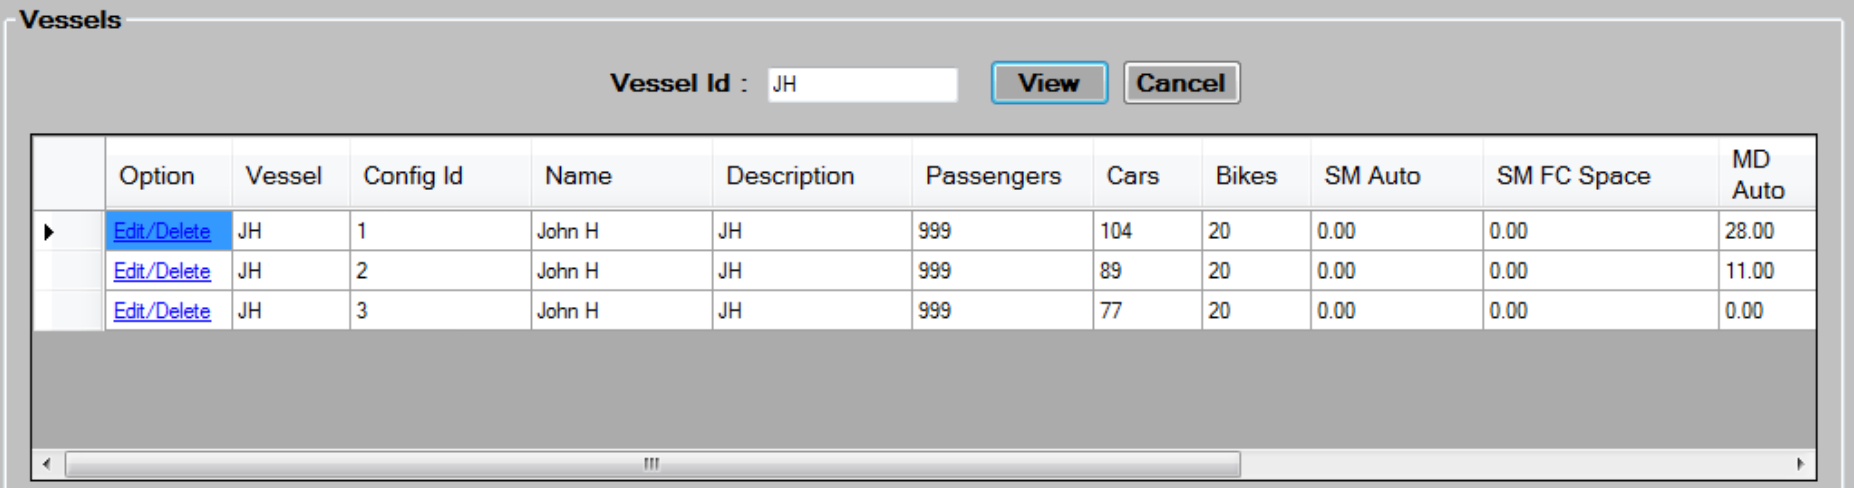
- Select the Vessel ID, and then press the
 button to display the existing Vessel entries.
 - Hit the
 button to the left of the Vessel you wish to edit or delete.
 - The bottom of the screen will populate with the information about the Vessel you selected.
- Edit the data in the desired fields, as required. See the Adding New Vessels section for more information on each field.
- Press the
 button to save changes then, press to continue.
 - To delete, select a Vessel by pressing the link, then press the button at thebottom of the screen. Press to continue.
- If the vessel takes Truck size vehicles, then continue to the Truck Lane Configuration section.
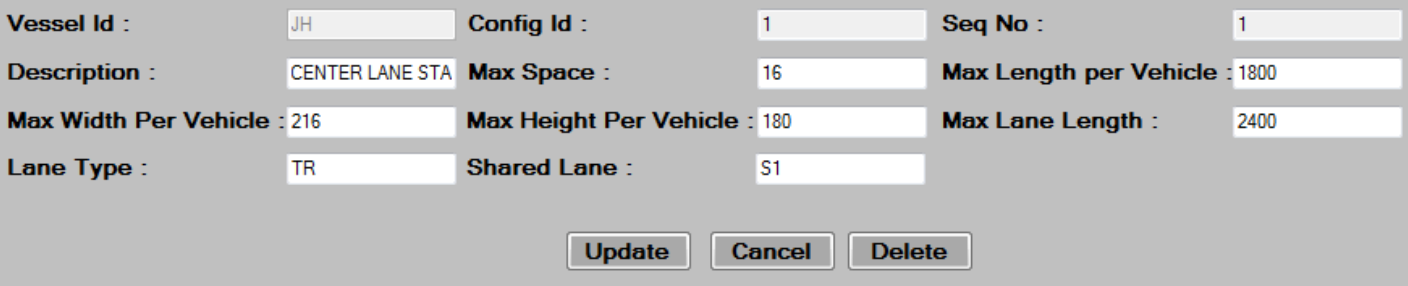
Setting Up the Truck Lane Configuration
- Press the
 button to setup the Truck Lane Configuration.

- Type in a
 for the truck lane you are defining.
 - Type in the
 that will be used if this truck lane is filled up to capacity. This figure is the number of auto spaces that this lane will use when full.
 - Type in the
 (in inches) that can be accepted in this truck lane.This figure represents the longest truck that can be accepted in this lane.
 - Type in the
 (in inches) that can be accepted in this truck lane. If this lane is a shared lane, type in the max width across both lanes.
 - Type in the
 (in inches) that can be accepted in this lane on thisvessel.
 - Type in the
 (in inches) for this lane. This figure represents thetotal length of the lane.
 - Type in the
 . This field should contain TR, which stands for Truck.
 - Type in a value in
 if this lane is part of a side by side lane that canbe used for wide load type vehicles. As an example, if the middle lane of the vessel is 20 feet wide, you could define two separate identical lanes, and type S1 in the shared lane field of each lane. Having S1 in the shared lane field of each lane tells the system that these lanes can be combined to allow wide load trucks on the vessel.
 - Press the
 button to add the truck lane.
 - Repeat the process for each truck lane to be defined for the vessel.
Editing/Deleting a Truck Lane Configuration
- Press the
 button to enter the Vessel Config section.
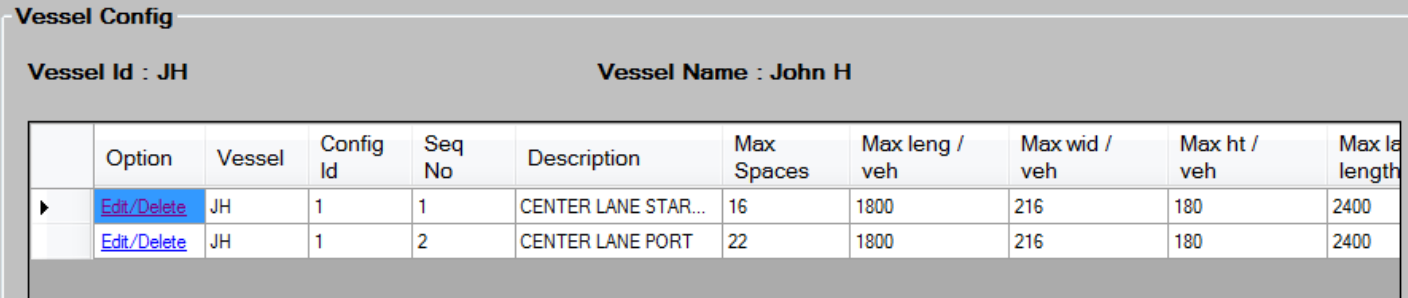
- Hit the link to the left of the Vessel Config you wish to edit or delete.
- The bottom of the screen will populate with the information about the Vessel Config you selected.
- Edit the data in the desired fields, as required. See the Setting Up Truck Lane Configuration section for more information on each field.
- Press the
 button to save changes then, press to continue.
 - To delete, select a Vessel Config by pressing the link, then press the
 button at the bottom of the screen. Press to continue.